Configure global proxy on linux
- December 6, 2020
- Reading time . 12 min
- Author: Yuniel Acosta

In GNU/Linux operating systems when we are behind a proxy server, it can become a bit cumbersome to use programs that do not have their own proxy configuration or commands like apt-get, or we simply want to configure it globally. Many of the GNU/Linux distributions use different package managers which are configured in different ways, in addition there are many programs that need their specifications to configure the Internet output through a proxy server. All this process becomes very cumbersome to do in environments where you use a proxy with authentication and it changes from time to time or you use a laptop where you can constantly connect to networks where proxy is not used. Imagine changing all the settings every time you change networks.

Here are some examples of how to configure proxy in some GNU/Linux distros
Terminal Proxy Settings
If we want to use a proxy temporarily in the terminal, we execute the following commands:
    export http_proxy=http://username:password@proxyserver:puerto
    export https_proxy=$http_proxy
Setting environment variables for Debian|Ubuntu family distributions
Edit file /etc/environment with your favorite text editor.
sudo vim /etc/environment
We add the following lines to the file, you must duplicate them in upper and lower case because (unfortunately) some programs only search for one or the other:
    http_proxy http://username:password@proxyserver:puerto
    https_proxy http://username:password@proxyserver:puerto
    ftp_proxy http://username:password@proxyserver:puerto
    no_proxy localhost,127.0.0.1,localaddress,.localdomain.com
    #Duplicated in uppercase
    HTTP_PROXY http://username:password@proxyserver:puerto
    HTTPS_PROXY http://username:password@proxyserver:puerto
    FTP_PROXY http://username:password@proxyserver:puerto
    NO_PROXY localhost,127.0.0.1,localaddress,.localdomain.com
Setting environment variables for distributions of the RedHat|Fedora|Centos family
sudo vim /etc/profile.d/proxy.sh
We modify the necessary parameters
    export http_proxy="http://username:password@proxyserver:puerto/"
    export https_proxy="http://username:password@proxyserver:puerto/"
    export ftp_proxy="http://username:password@proxyserver:puerto/"
Proxy settings for apt-get, apt, aptitude
We create or edit file /etc/apt/apt.conf
sudo vim /etc/apt/apt.conf
We add the following lines:
    Acquire::http::Proxy "http://username:password@proxyserver:puerto";
    Acquire::https::Proxy "http://username:password@proxyserver:puerto";
    Acquire::ftp::Proxy "http://username:password@proxyserver:puerto";
    #En caso de tener un repo local para el que no necesitemos proxy
    Acquire::http::Proxy {
    repositorio.localdomain.com DIRECT;
    repositorio2.localdomain.com DIRECT;
    };
Proxy settings for yum
Edit file /etc/yum.conf
    # proxy server address and port
    proxy=http://proxyserver:puerto
    # user and password
    proxy_username=usuario
    proxy_password=contraseña
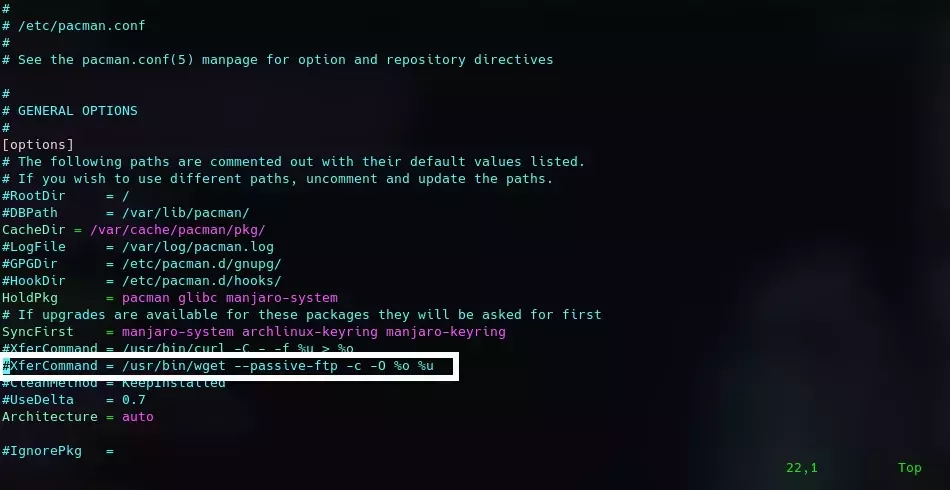
Proxy settings for pacman
We edit the file /etc/pacman.conf and we must uncomment XferCommand as follows:
XferCommand = /usr/bin/wget --passive-ftp -c -O %o %u
We save the changes and proceed to edit the configuration file for wget, a tool used to download packages.
sudo vim /etc/wgetrc
We edit the configuration file /etc/wgetrc, look for the following lines and uncomment or add them to the end of the file.
    https_proxy = http://username:password@proxyserver:puerto
    http_proxy = http://username:password@proxyserver:puerto
    ftp_proxy = http://username:password@proxyserver:puerto
    use_proxy = on
Proxy configuration for nodejs (npm)
    npm config set proxy http://username:password@proxyserver:puerto
    npm config set https-proxy http://username:password@proxyserver:puerto
Proxy configuration for Git
    git config --global http.proxy http//proxyserver:puerto
    git config --global https.proxy https//proxyserver:puerto
    # In case we have a direct connection and we need to remove the proxy settings from git
    git config --global --unset http.proxy
    git config --global --unset https.proxy
As you can see, it is very complex to constantly maintain the configuration of a proxy on your pc, but luckily there are other options that allow you to configure a proxy globally to the entire operating system. In systems such as Windows or MacOS there are tools such as Proxifier, ProxyCap among others that facilitate access to the internet through a proxy, on the other hand GNU/Linux operating systems have alternatives to these programs like the ones listed below.
Redsock
Redsock is a tool that allows you to redirect any TCP connection to SOCKS or HTTPS proxy using your firewall, so the redirection can be system-wide or network-wide . This tool is very useful because it allows us with a single configuration file to be able to use the connection through the proxy throughout the operating system.
Packages for the different linux distributions
- Archlinux/Manjaro: redsocks-git
- Debian: redsocks
- Gentoo (zugaina overlay): redsocks
- Gentoo: redsocks
- Ubuntu: redsocks
Manual compilation of redsock
To compile redsock we need to clone its repository on GitHub https://github.com/darkk/redsocks and follow the instructions in the README.md. libevent-2.0.x must be installed on our system, as well as the gcc andclang compilers. Compilation is as easy as running make in the project’s root directory.
Run redsock
Running redsock depends a lot on the distribution you are using and how the package installed redsock. The program has the following command line options:
- -c specifies the path to the configuration file (
./redsocks.confis used by default) - -t this option checks the syntax of the configuration file.
- -p set a file to write the
getpid()where the following signals are specified:SIGUSR1dumps the list of connected clients to the registry,SIGTERMandSIGINTterminate the daemon, all active connections are closed.
You can see an example of the configuration file in redsocks.conf.example.
Iptables example
You have to build iptables with connection tracking and REDIRECT target.
  # Create new chain
  root# iptables -t nat -N REDSOCKS

  # Ignore LANs and some other reserved addresses.
  # See http://en.wikipedia.org/wiki/Reserved_IP_addresses#Reserved_IPv4_addresses
  # and http://tools.ietf.org/html/rfc5735 for full list of reserved networks.
  root# iptables -t nat -A REDSOCKS -d 0.0.0.0/8 -j RETURN
  root# iptables -t nat -A REDSOCKS -d 10.0.0.0/8 -j RETURN
  root# iptables -t nat -A REDSOCKS -d 100.64.0.0/10 -j RETURN
  root# iptables -t nat -A REDSOCKS -d 127.0.0.0/8 -j RETURN
  root# iptables -t nat -A REDSOCKS -d 169.254.0.0/16 -j RETURN
  root# iptables -t nat -A REDSOCKS -d 172.16.0.0/12 -j RETURN
  root# iptables -t nat -A REDSOCKS -d 192.168.0.0/16 -j RETURN
  root# iptables -t nat -A REDSOCKS -d 198.18.0.0/15 -j RETURN
  root# iptables -t nat -A REDSOCKS -d 224.0.0.0/4 -j RETURN
  root# iptables -t nat -A REDSOCKS -d 240.0.0.0/4 -j RETURN

  # Anything else should be redirected to port 12345
  root# iptables -t nat -A REDSOCKS -p tcp -j REDIRECT --to-ports 12345

  # Any tcp connection made by `luser' should be redirected.
  root# iptables -t nat -A OUTPUT -p tcp -m owner --uid-owner luser -j REDSOCKS

  # You can also control that in more precise way using `gid-owner` from
  # iptables.
  root# groupadd socksified
  root# usermod --append --groups socksified luser
  root# iptables -t nat -A OUTPUT -p tcp -m owner --gid-owner socksified -j REDSOCKS

  # Now you can launch your specific application with GID `socksified` and it
  # will be... socksified. See following commands (numbers may vary).
  # Note: you may have to relogin to apply `usermod` changes.
  luser$ id
  uid=1000(luser) gid=1000(luser) groups=1000(luser),1001(socksified)
  luser$ sg socksified -c id
  uid=1000(luser) gid=1001(socksified) groups=1000(luser),1001(socksified)
  luser$ sg socksified -c "firefox"

  # If you want to configure socksifying router, you should look at
  # doc/iptables-packet-flow.png, doc/iptables-packet-flow-ng.png and
  # https://en.wikipedia.org/wiki/File:Netfilter-packet-flow.svg
  # Note, you should have proper `local_ip' value to get external packets with
  # redsocks, default 127.0.0.1 will not go. See iptables(8) manpage regarding
  # REDIRECT target for details.
  # Depending on your network configuration iptables conf. may be as easy as:
  root# iptables -t nat -A PREROUTING --in-interface eth_int -p tcp -j REDSOCKS
Redsock is one of my favorite tools for configuring all my internet traffic through a proxy using the TCP protocol. Below I show you another more recent alternative that is very interesting and easy to configure.
Proxifier-For-Linux
Proxifier-For-Linux is a tool that acts as an intermediary between the proxy server and client programs that need internet access. Proxifier works through proxy servers on behalf of the other programs. Proxifier acts as a global point to configure proxy rules, which will apply to all programs on the system. As I mentioned above it is a new project so currently it only has support for http proxies.
As explained in the official Proxifier-for-linux repository, our operating system must have the following dependencies
Dependencies
Below is the list of dependencies required to compile and run Proxifier, as well as the installation depending on the operating system you use.
Install dependencies
To check if you already have the dependencies installed you can use the command which <package name>. Example which autoconf and if it returns the path, that dependency is already installed
- autoconf [sudo apt install autoconf]
- automake [sudo apt install automake]
- libtool [sudo apt install libtool]
- txt2man [sudo apt install txt2man]
Download Proxifier
Get the latest stable version of Proxifier by cloning the GitHub repository.
git clone https://github.com/m0hithreddy/Proxifier-For-Linux.git && cd Proxifier-For-Linux
Build and Install
After installing all the dependencies, get the Proxifier source code and inside the directory where the code is, run the following commands:
autoreconf -vfi
./configure
make all
sudo make uninstall
sudo make install
How to use Proxifier
The Proxifier service can be enabled by running the command:
sudo systemctl daemon-reload # Reload the service units
sudo systemctl start proxifier
For more information about Proxifier you can consult the help by executing the command man proxifier. The configuration file can be found in the path /usr/local/etc/proxifier.conf where you can specify your proxy settings.
The next tool I want to show you is Proxychains
Proxychains
Proxychains-ng is a proxy server that supports the HTTPs, SOCKS4 and SOCKS5 internet protocols and works on Unix-based platforms. It allows any TCP connection made by a program to follow a series of proxies (of the aforementioned protocols) to its destination. The list of proxies as well as the proxy selection strategy are defined beforehand.
Install proxychains
Proxychains is available with pkgsrc for everyone who uses it on Linux, NetBSD, FreeBSD, OpenBSD, DragonFlyBSD or Mac OS X You just need to install pkgsrc-wip and run make install in thewip/proxychains directory
Install proxychains from source code
Clone the GitHub source code and run the following commands:
 git clone https://github.com/haad/proxychains.git && cd proxychains
 # se necesita un compilador de C, preferiblemente gcc
 ./configure
 make
 sudo make install
Packages for the different linux distributions
- Archlinux/Manjaro: proxychains-ng/
- Debian: proxychains
- Gentoo: proxychains
- Fedora: proxychains-ng
- Ubuntu: proxychains
Setting
Proxychains looks for the settings in the following order:
- SOCKS5 proxy port in environment variable ${PROXYCHAINS_SOCKS5} (if set, no further settings will be searched)
- File listed in the environment variable ${PROXYCHAINS_CONF_FILE} or provided as an -f argument to the proxychains script or binary.
- ./proxychains.conf
- $(HOME)/.proxychains/proxychains.conf
- /etc/proxychains.conf
See more of the configuration in the file /etc/proxychains.conf
Example of how to configure multiple proxies
At the end of the /etc/proxychains.conf file is the list where we can add our proxies. Proxy selection strategies vary between dynamic_chain, strict_chain, round_robin_chain, random_chain and only one can be uncommented.
- dynamic_chain: Dynamic - Each connection will be made through chained proxies, all proxies chained in the order listed, at least one proxy must be online to play chained (dead proxies are skipped) otherwise EINTR is returned to the application
- strict_chain: Strict: each connection will be made through chained proxies, all proxies chained in the order they appear in the list, all proxies must be online to play chain; otherwise, EINTR is returned to the application
- round_robin_chain: Round Robin: each connection will be made through chained proxies of length
chain_len, all proxies chained in the order they appear in the list, at least one proxy must be online to play chain (dead proxies are skipped ). the start of the current proxy chain is the proxy after the last proxy in the previously invoked proxy chain. If the end of the proxy chain is reached while searching for proxies, start over from the beginning. Otherwise, EINTR is returned to the application. These semantics are not guaranteed in a multithreaded environment. - random_chain: Random - Each connection will be made using a random proxy (or proxy chain, see
chain_len) from the list.
 [ProxyList]
 # add proxy here ...
 # meanwile
 # defaults set to "tor"
 socks4  127.0.0.1 9050
 #psiphon proxy
 http 127.0.0.1 52525
 socks5 127.0.0.1 42552
 #Otro Proxy
 http 192.168.1.11 8080 user password
 #Mobile proxy
 http 192.168.44.244 3128 user password
Examples of use
Run proxychains <programa a ejecutar a través de un proxy>
proxychains telnet targethost.com
In this example it will run telnet through proxy(or chained proxies) specified by proxychains.conf
Proxychains gives us a great advantage by being able to chain many proxies at the same time, which is used a lot in cybersecurity to hide the identity of the requests made. One of the disadvantages of proxychains is that it runs in the console, which is uncomfortable when we use programs with a graphical interface.
The next one on the list is one of my favorites because it is a VPN that allows you to configure a global proxy for the entire operating system as well as mount a firewall on the pc.
Windscribe
Windscribe is a set of tools that allow you to block ad trackers and web beacons, restore access to blocked content, and help you protect your privacy online. There are two components:
the VPN desktop application (Windows, MacOS and Linux) and the browser extension (Chrome, Edge, Firefox, Safari, …)
The desktop application is a VPN (Virtual Private Network) client. Create an encrypted tunnel from your computer to the winscribe servers, and all your activity is sent through the tunnel. This has two advantages:
- The IP address of your Internet Service Provider (ISP) is masked, so any website you visit or any application you use (Skype, email providers, BitTorrent, etc.) will see our IP address shared by thousands of persons.
- Your Internet Service Provider cannot see what you are doing online. This is much more important than you think.
The first thing to do is create an account at Windscribe by registering here. Windscribe gives us 2GB of free monthly consumption, but if we confirm our email this increases 5GB, you can also increase up to 15GB per month if you create a post on twitter by clicking the Tweet4Data button in your account settings.

Install Windscribe
After registering, the desktop client or the extension for your favorite browser is downloaded in the Downloads session. Follow the instructions in the download link depending on the operating system you use.
Configuring the Windscribe Client for Linux
The first thing we have to do is start the windscribe service for this we execute the command:
sudo systemctl start windscribe
Once the windscribe service is running, we must configure the proxy by executing the command windscribe proxy --host <proxy address> --port <port> --user <user> --password <password>:
windscribe proxy --host 19.18.4.54 --port 3128 --user acosta --password "super password"
windscribe proxy on
With the previous commands we configure and activate windscribe to use our proxy. Now when to connect all the applications go to the internet through Windscribe we execute the command:
windscribe connect best # Nos conecta al servidor de windscribe con mejor rendimiento
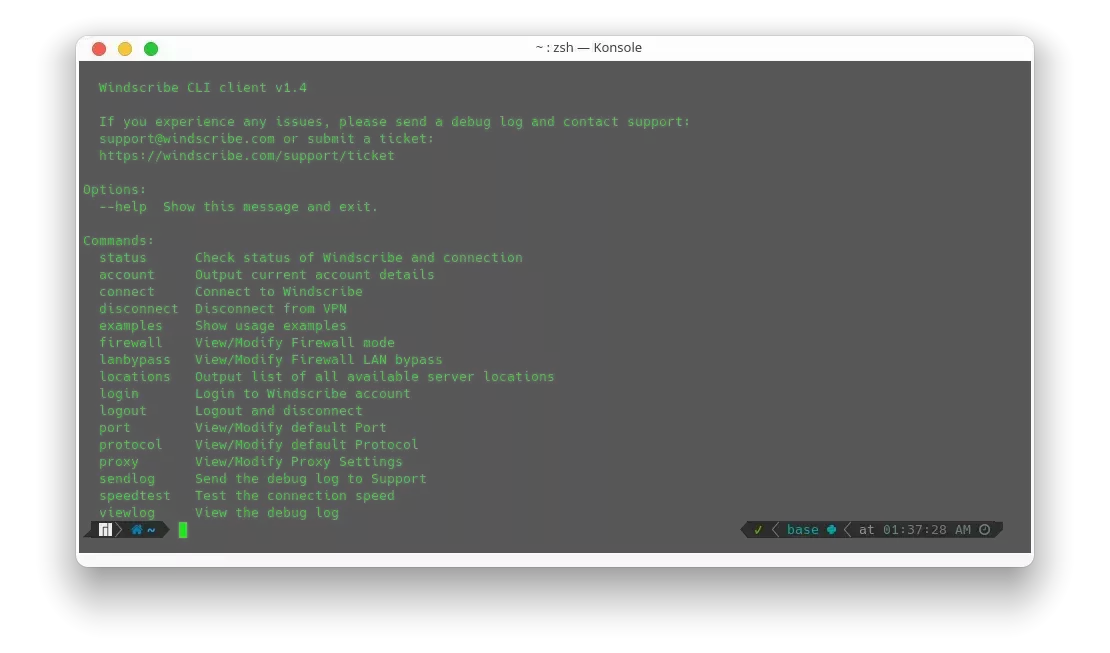
To consult the help of windscribe we can execute the command windscribe --help
These are some options that exist to configure Internet accesses through a proxy in GNU-Linux operating systems. Of all the variants shown in this article my favorite without a doubt is windscribe for all the facilities it offers. I hope it helps you in case you want to have a proxy configured globally in linux.